How to Draw a Hawaiian Flower A Step-by-Step Manual
Hawaii is a place of incredible natural beauty. You can expect to see volcanic landscapes, lush jungles, and sparkling beaches in this incredible state, and it is also well known for its incredible animal and plant life on display. The Hawaiian flower is one of the most iconic symbols of Hawaii, and learning how to draw a Hawaiian flower is a great way to replicate a little part of Hawaii for yourself. With this step-by-step guide on how to draw a Hawaiian flower in just 6 easy steps, you can bring a little piece of Hawaii into your life and have a lot of fun doing it.
Also read: rose flower drawing
How to Draw a Hawaiian Flower – let’s get Initiated!
Step 1
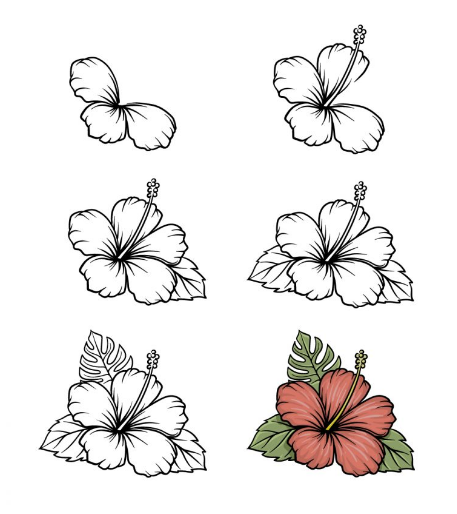
For this first step in our guide on how to draw a Hawaiian flower, we’ll start with a single petal of the flower. These petals will have quite a bit of detail and be made of a rounded shape with a narrower point. This little part will be where the petal links to the center of the flower.
Finally, you can finish with rounded lines running the petal length to give it more textural details. Once you have replicated the petal as it appears in the reference image, you are ready to proceed to the next step.
Step 2
Now that you’ve created a petal for your Hawaiian flower drawing, you shouldn’t have trouble drawing a few more! These will be similar to the ones above, but the sizes will differ. The one among the others will be the smallest, and the reference image will guide you to the position and size of these petals.
Step 3
We will add two elements in this step of our guide on how to draw a Hawaiian flower. First, we’ll add another petal near the top of the flower. Next, we’ll add a long, skinny column that goes up from the center of the flower. This column is called a style; you can draw it using thin curved lines from the center. This will end in a bulbous section with a few small round lines. That’s all there is to this step, so let’s proceed!
Step 4
This fourth step of your Hawaiian flower drawing will see you add the final petal for the image. This last petal will fill the slot left between the others, as shown in our contact image. Then, once you have all the petals, we’ll draw the first leaf. You can use some curved lines with sharp points for the edges of the leaf and then add some veins to it to finish.
Step 5
Using what you learned in the previous step of this guide on drawing a Hawaiian flower, you can draw another leaf for the plant. This leaf will have a very similar structure to the other, but it will be on the other side of the flower, almost like a mirror image. Once you’ve drawn that leaf, we’ll have some final details to add in the next step.
Step 6
It’s time to finish the details before adding amazing colors to your Hawaiian flower drawing. The major thing we’ll be counting will be the final leaf for the flower. However, this sheet will be quite different from the others. Instead of one big, solid sheet, it will have several sections along the edge that you can draw with some straight and curved lines. If that sounds confusing, the reference image will show you what it should look like! So your drawing is finished, and you are ready to go!
Before proceeding to the final step, you can also add some details to finish it off. You could use multiple ideas, from mixing the flower into a background or drawing better flowers next to it. You could do this by drawing more Hawaiian flowers taking what you have learned, or you could also draw some of your favorite flowers. How will you finish this drawing before the final step?
Step 7
You’ve done a great job on this guide on how to draw a Hawaiian flower, and now you can finish it off with some amazing colors! We used reds and greens for the flower in our reference image, but this is just one option. Of many, you could go to. These amazing flowers can come in many colors and shades, giving you plenty of options to add color. Picking colors is only part of the fun, as you can experiment with other art mediums. Watercolor paints can be great for this drawing as they give the image a soft look. However, any medium you use will look great, so be sure to use whatever art means you want to finish it!